Getting started with PyQt5 for Python GUI development
Another queueing model explorer
python
queueing
Author
Mark Isken
Published
August 11, 2017
Finally decided to take plunge down the rabbit hole of GUI development in Python for my hillmaker app. Much Googling led to a few options:
Tkinter
PyQt / PySide
Kivy
Jupyter widgets
Dash
Toga
some JavaScript/HTML/css solution for “single page web applications”
In a previous post I started by exploring Jupyter widgets. I created a notebook with interactive widgets to drive some simple queueing formulas. As a next step, I thought I’d give PyQt a try and create a very simple form widget queueing calculator. It would contain:
a slider for controlling the traffic intensity,
a slider for controlling the number of servers
an output label showing the calculated Erlang B value
an output label showing the calculated Erlang C value
See my previous post for background on the queueing formulas if you are interested, but it’s not necessary. I just wanted to use interactive widgets that when changed, call functions that return values to display.
Why PyQt?
As soon as you start looking into options for creating GUIs in Python, two venerable options emerge - Tkinter and PyQt. I spent many an hour exploring the results of “tkinter vs pyqt” web searches. A few conclusions regarding their relative merits for my purposes:
Tkinter
I was ready to go down this route as it seemed the best for newbie Python GUI dev, but then found it had no datepicker widget. Yes, I could build one but don’t want to unless I have to.
Pros
Comes as part of Python and thus no other dependencies for user to worry about.
These are two different Python bindings for the Qt package. Qt itself is a C++ based framework for developing cross-platform applications and GUIs. Qt is big and complicated and has tons of functionality and features. There are two versions of PyQt, PyQt4 and PyQt5, that correspond to Qt4 and Qt5. PyQt5 is not backwards compatible though it’s said to be easy to port from 4 to 5. Since I’ve never used Qt, nor PyQt, 5 it is.
Both bindings seem widely used with differences related to Python version compatibility and licensing. Since hillmaker is Apache 2.0 licensed, should be no problem to use PyQt but then the combined package might have to be GPL licensed (not that that’s a deal breaker). PySide offers a LGPL license but is PyQt4 only. The PySide2 project is for providing Qt5 compatibility but looks like it’s still a work in progress. For now, looks like PyQt5 is the way to go.
Pros
Qt is widely used and super full featured
Python 3 and Qt5 supported by PyQt5
Visual designer Qt Designer available to help with GUI dev
Probably more complicated to get started with than Tkinter.
Documentation for PyQt5 not super available (many PyQt4 tuts). Some recommend using the Qt5 API docs and just use the PyQt5 docs for Pythons specific stuff.
I can always explore Tkinter after playing around with PyQt5.
Qt Designer installation
Even though I’ll be hand coding this first simple widget, figured I might as well install the Qt Designer to get a sense of the range and capabilities of the widgets available. Also, it might prove useful to be able to explore code generated from a visual design since I have no experience coding with PyQt5.
The Qt Designer creates an XML file with .ui extension that specifies the GUI design. Then you can use the utility pyuic5 to convert the ui file into Python code that can then be imported into application.
By looking at the created Python file, one can learn quite a bit about how to code with PyQt5.
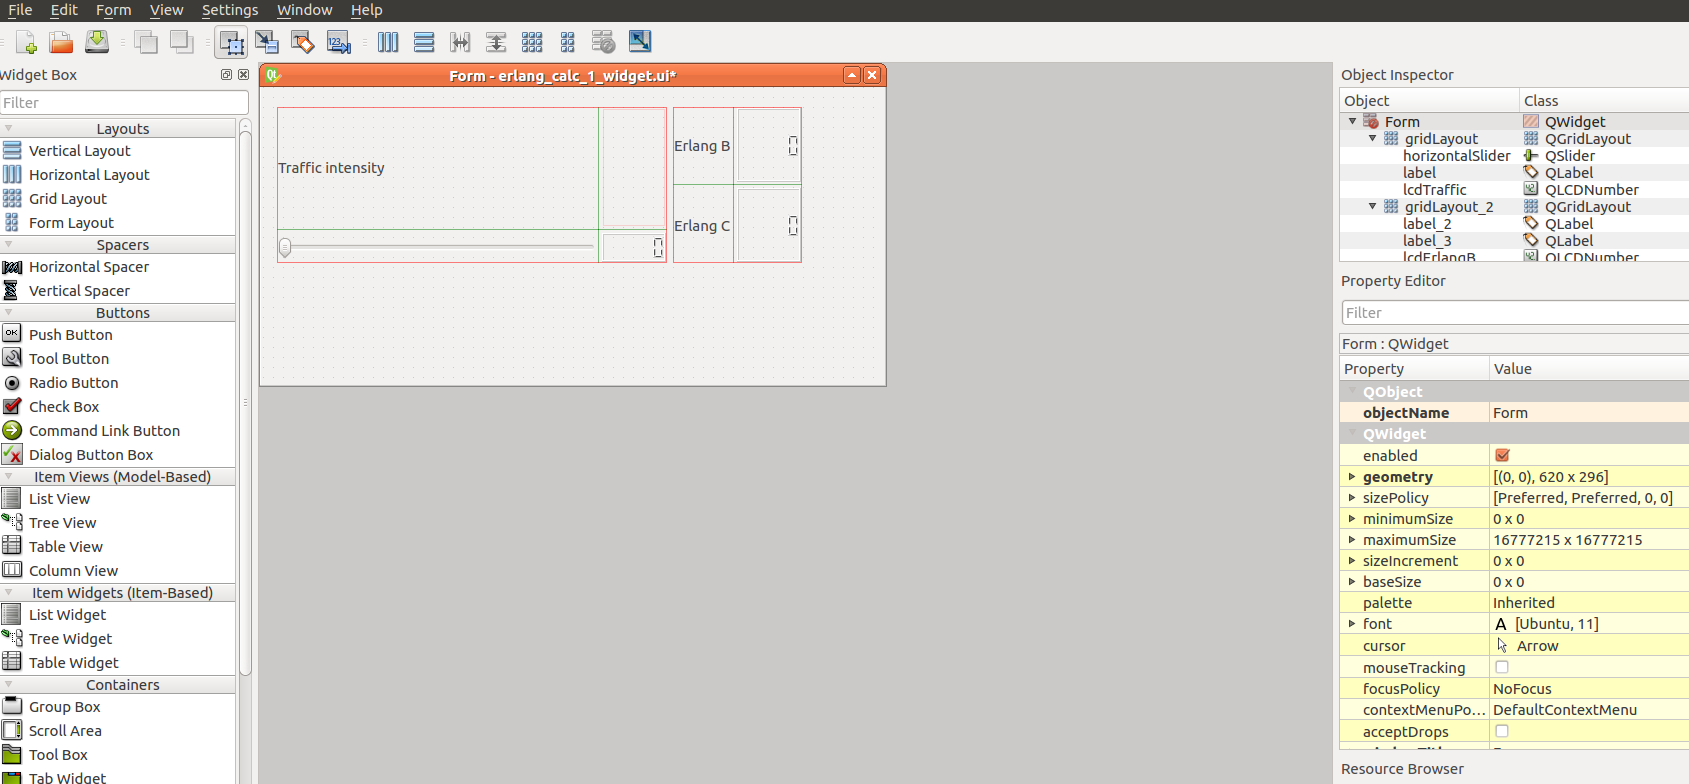
Here’s a screenshot of some early versions of this Erlang Calculator widget in Qt Designer.
image
The Erlang Calculator Widget
For this first foray into PyQt5 I’m not going to worry about making things look nice. Instead, I just want to get a minimal working example.
PyQt5 uses various layout objects such as QVBoxLayout, QHBoxLayout and QGridLayout to act as containers for QWidget objects. The layout objects can be nested and widgets positioned inside of them. When the widget or application window is resized, the layouts and widgets are automatically resized.
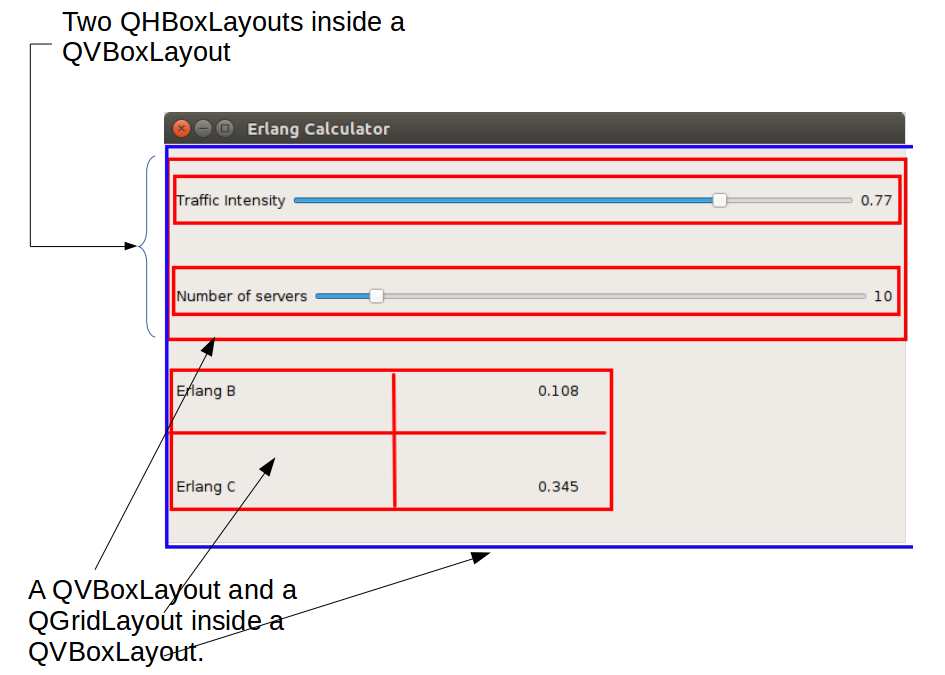
Here’s how the Erlang Calculator widget is structured:
image
Yes, this first version is clunky looking. Making it pretty will be for another day. Let’s see how it works. Here’s the heavily commented code.
#!/usr/bin/python3# -*- coding: utf-8 -*-"""qng_pyqt5_1.py - hselab PyQt5 example A simple PyQt5 widget for exploring Erlang B and C queueing models.Author: miskenWebsite: hselab.orgLast edited: August 2017"""import sysfrom PyQt5.QtCore import Qtfrom PyQt5.QtWidgets import (QWidget, QSlider, QLabel, QGridLayout, QVBoxLayout, QHBoxLayout, QApplication)import qngclass ErlangCalc(QWidget):""" Simple Erlang B and Erlang C calculator. It's implemented as a Qt Widget and so we use QWidget as the base class. """def__init__(self):""" Construct an ErlangCalc object. """# Call the parent class constructor.super().__init__() # Python3 lets us avoid super(Example, self).# Initialize and display the user interfaceself.initUI()def initUI(self):""" Creates the user interface and displays it. """# Create rho slider widget and set min and max valuesself.sld_rho = QSlider(Qt.Horizontal)self.sld_rho.setMinimum(0)self.sld_rho.setMaximum(100)self.sld_rho.setValue(70)# Create server slider widget and set min and max valuesself.sld_numservers = QSlider(Qt.Horizontal)self.sld_numservers.setMinimum(0)self.sld_numservers.setMaximum(100)self.sld_numservers.setValue(10)# Create labels for sliders and their values rho =self.sld_rho.value() /100 rho_slider_val ='{:.2f}'.format(rho) numservers_slider_val ='{:d}'.format(self.sld_numservers.value()) lbl_rho = QLabel("Traffic Intensity")self.lbl_rho_value = QLabel(rho_slider_val) lbl_numservers = QLabel("Number of servers")self.lbl_numservers_value = QLabel(numservers_slider_val)# Create a label and a label widget to show Erlang B and C valueself.lbl_erlangb_value = QLabel("0.00") lbl_erlangb = QLabel("Erlang B")self.lbl_erlangc_value = QLabel("0.00") lbl_erlangc = QLabel("Erlang C")# Create grid layouts to hold the various widgets. The main layout# will contain the traffic and erlang grids. The traffic grid will# contain the two slider grids. grid_main = QVBoxLayout() grid_traffic = QVBoxLayout() grid_rho = QHBoxLayout() grid_numservers = QHBoxLayout() grid_traffic.addLayout(grid_rho) grid_traffic.addLayout(grid_numservers) grid_erlang = QGridLayout()# Since grid_traffic and grid_erlang are not top-level layouts,# need to add them to parent layout before adding anything to them.# See http://doc.qt.io/qt-5/qgridlayout.html#details grid_main.addLayout(grid_traffic) grid_main.addLayout(grid_erlang)# Now add the widgets to their respective grid layouts grid_rho.addWidget(lbl_rho) grid_rho.addWidget(self.sld_rho) grid_rho.addWidget(self.lbl_rho_value) grid_numservers.addWidget(lbl_numservers) grid_numservers.addWidget(self.sld_numservers) grid_numservers.addWidget(self.lbl_numservers_value)# Since the erlang grid is a QGridLayout, we specify row# and column numbers within which to place the widgets. grid_erlang.addWidget(lbl_erlangb, 0, 0) grid_erlang.addWidget(self.lbl_erlangb_value, 0, 1) grid_erlang.addWidget(lbl_erlangc, 1, 0) grid_erlang.addWidget(self.lbl_erlangc_value, 1, 1)# Set the layout for the ErlangCalc widgetself.setLayout(grid_main)# Hook up slider to a sliderchange functionself.sld_rho.valueChanged.connect(self.sliderchange)self.sld_numservers.valueChanged.connect(self.sliderchange)# Position and size the widget (x, y, width, height)self.setGeometry(300, 300, 650, 350)# Set window titleself.setWindowTitle('Erlang Calculator')# Display the ErlangCalc widgetself.show()def sliderchange(self):""" Update widget display when either slider value changes """# Compute traffic intensity based on integer slider value rho =self.sld_rho.value() /100 load =self.sld_numservers.value() * rho# Create formatted string to display rho_slider_val ='{:.2f}'.format(rho) numservers_slider_val ='{:d}'.format(self.sld_numservers.value())# Set the text property of the traffic value labelself.lbl_rho_value.setText(rho_slider_val)self.lbl_numservers_value = QLabel(numservers_slider_val)# Compute erlang values - Erlang C only valid for rho < 1. erlangb ='{:0.3f}'.format(qng.erlangb(load, self.sld_numservers.value()))if rho <1: erlangc ='{:0.3f}'.format(qng.erlangc(load, self.sld_numservers.value()))else: erlangc ='NA'self.lbl_erlangb_value.setText(erlangb)self.lbl_erlangc_value.setText(erlangc)if__name__=='__main__':# All Qt apps need a QApplication object app = QApplication(sys.argv)# Create a new ErlangCalc widget ex = ErlangCalc()# Bail when user closes widget sys.exit(app.exec_())